SwiftUI Previews at Scale
Although SwiftUI previews fulfill their goal of generating dynamic, interactive previews, they come not without a price. SwiftUI previews sit on the boundary of test and production code, therefore, when applied systematically, they inevitably result in test code leaking into production. In this article let’s learn three techniques to help you manage SwiftUI previews at scale:
- Extracting reusable previews into components.
- Combining groups of previews into presets.
- Using Fixture Object pattern to simplify object graph instantiation.
This is not an introduction to the subject. We won’t discuss how to generate SwiftUI previews or what you can get from them. To get started with SwiftUI previews, I recommend this tutorial by Apple.
Problem Statement
SwiftUI previews are easy to get started with. However, as your app grows in features in complexity, you are likely to encounter the problem of using SwiftUI previews at scale.
Extensive use of SwiftUI previews increases the cost of changing your code.
If you check Apple SwiftUI tutorials, you’ll discover that a single SwiftUI view has 2 previews on the average. From my own experience, I have 4-5 previews per view. Therefore, we can conclude that a typical production iOS app contains hundreds, if not thousands, previews.
Unless treated correctly, previews can potentially worsen maintainability of your codebase and slow down development speed:
- Previews are treated as throwaway code. The number of previews keeps accumulating, reducing the overall quality of the codebase.
- Previews contain repeated configuration code. Typically, we set up most of the previews under the same set of conditions, e.g., multiple locales, dark and light color themes, several supported devices. When we add a new preview, we just copy and paste the configuration code.
- A complex object graph needs to be constructed for the purpose of a preview since a view depends on that graph. This way, previews setup code becomes bloated and fragile.
The solution is to follow the three techniques that will help us streamline SwiftUI previews.
Technique #1: Extracting Reusable Previews
The current strategy addresses the problem of boilerplate configuration code.
Before we jump to the solution, let’s see how previews turns out to be a mess even for a trivial SwiftUI control. Given a button:
struct SendButton: View {
    let onAction: () -> Void = {}

    var body: some View {
        Button(
            action: onAction,
            label: {
                HStack {
                    Image(systemName: "square.and.arrow.up")
                    Text("common.button.send")
                }
        })
    }
}
In a preview, we want to check the following SendButton states:
- Supported locales
- Dark theme
- Right-to-left text direction
- Multiple content size categories
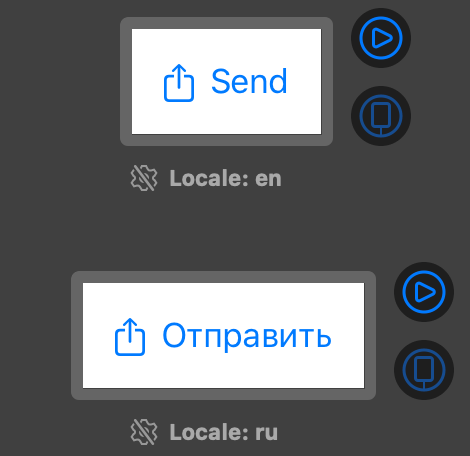
Here is how we can preview multiple locales:
struct SendButton_Preview: PreviewProvider {
    static var previews: some View {
        Group {
            // Supported locales
            ForEach(Locale.all, id: \.self) { locale in
                SendButton()
                    .padding()
                    .previewLayout(PreviewLayout.sizeThatFits)
                    .environment(\.locale, locale)
                    .previewDisplayName("Locale: \(locale.identifier)")
            }
        }
    }
}

// From https://www.avanderlee.com/swiftui/previews-different-states/
extension Locale {
    static let all = Bundle.main.localizations
        .map(Locale.init)
        .filter { $0.identifier != "base" }
}
The preview looks next:

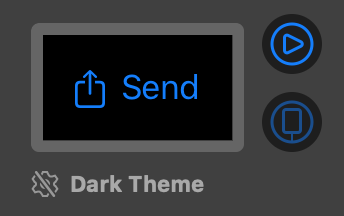
Then we setup preview for the dark theme:
...
// Dark theme
SendButton()
    .padding()
    .previewLayout(PreviewLayout.sizeThatFits)
    .background(Color(.systemBackground))
    .environment(\.colorScheme, .dark)
    .previewDisplayName("Dark Theme")
...
The dark preview looks next:

Lastly, add the right-to-left and dynamic size previews:
static let sizeCategories: [ContentSizeCategory] = [.extraSmall, .medium, .extraExtraExtraLarge]
...
// Right to left
SendButton()
    .padding()
    .previewLayout(PreviewLayout.sizeThatFits)
    .environment(\.layoutDirection, .rightToLeft)
    .previewDisplayName("Right to Left")

// Content size categories
ForEach(sizeCategories, id: \.self) { sizeCategory in
    SendButton()
        .padding()
        .previewLayout(PreviewLayout.sizeThatFits)
        .environment(\.sizeCategory, sizeCategory)
        .previewDisplayName("Content Size Category: \(sizeCategory)")
}
...
That’s 40 lines of preview code for a 10-lines control. Instead of pasting this code for all future previews, let’s extract it into reusable components:
struct LocalePreview<Preview: View>: View {
    private let preview: Preview

    var body: some View {
        ForEach(Locale.all, id: \.self) { locale in
            self.preview
                .previewLayout(PreviewLayout.sizeThatFits)
                .environment(\.locale, locale)
                .previewDisplayName("Locale: \(locale.identifier)")
        }
    }

    init(@ViewBuilder builder: @escaping () -> Preview) {
        preview = builder()
    }
}

struct DarkThemePreview<Preview: View>: View {
    ...
}

struct RightToLeftPreview<Preview: View>: View {
    ...
}

struct ContentSizeCategoryPreview<Preview: View>: View {
    ...
}
It allows us to rewrite the initial preview into this:
struct SendButton_Preview_ReusablePreviews: PreviewProvider {
    static var previews: some View {
        Group {
            LocalePreview { SendButton().padding() }

            DarkThemePreview { SendButton().padding() }

            RightToLeftPreview { SendButton().padding() }

            ContentSizeCategoryPreview(.extraSmall) { SendButton().padding() }

            ContentSizeCategoryPreview(.medium) { SendButton().padding() }

            ContentSizeCategoryPreview(.extraExtraExtraLarge) { SendButton().padding() }
        }
    }
}
Technique #2: Preview Presets
Apart from reusing individual previews, we can also reuse groups of previews. I call this group a preview preset.
To create a preset, it’s convenient to begin with extension methods that simplify preview creation:
extension View {
    func previewSupportedLocales() -> some View {
        LocalePreview { self }
    }

    func previewDarkTheme() -> some View {
        DarkThemePreview { self }
    }

    func previewRightToLeft() -> some View {
        RightToLeftPreview { self }
    }

    func previewContentSize(_ sizeCategory: ContentSizeCategory) -> some View {
        ContentSizeCategoryPreview(sizeCategory) { self }
    }
}
Next, define a preset that we are going to use for all buttons:
extension View {
    func previewButtonPreset() -> some View {
        let content = self.padding()

        return Group {
            content.previewSupportedLocales()
            content.previewRightToLeft()
            content.previewDarkTheme()
            content.previewContentSize(.extraSmall)
            content.previewContentSize(.medium)
            content.previewContentSize(.extraExtraExtraLarge)
        }
    }
}
Now the SendButton preview turns out to be a one-liner:
struct SendButton_Preview: PreviewProvider {
    static var previews: some View {
        SendButton()
            .previewButtonPreset()
    }
}
Technique #3: Fixture Object Pattern
This recipe simplifies the construction of complex object graphs for the purpose of previews.
It’s very common for SwiftUI views to render deeply nested objects and objects with many properties. This results in the following problems:
- You are interested in previewing only one property, but still need to instantiate the whole object graph. This way, the preview receives data that it does not need.
- The amount of repeated initialization code increases.
- Introduces extra room for mistake.
These problems become evident even if we take Apple SwiftUI tutorial, and try to preview a list of two Landmarks using custom data:
struct LandmarksList_Previews: PreviewProvider {
    static var previews: some View {
        let landmark1 = Landmark(
            id: 1,
            name: "Turtle Rock",
            imageName: "turtlerock",
            coordinates: Coordinates(latitude: 34.011286, longitude: -116.166868),
            state: "California",
            park: "Joshua Tree National Park",
            category: .rivers,
            isFavorite: true
        )

        let landmark2 = Landmark(
            id: 2,
            name: "Silver Salmon Creek",
            imageName: "silversalmoncreek",
            coordinates: Coordinates(latitude: 59.980167, longitude: -152.665167),
            state: "Alaska",
            park: "Lake Clark National Park and Preserve",
            category: .lakes,
            isFavorite: false
        )

        let userData = UserData()
        userData.landmarks = [landmark1, landmark2]

        return LandmarkList()
            .previewDevice("iPhone SE")
            .environmentObject(userData)
    }
}
If this was a one-off preview and you are completely sure that there will be no more previews like this one, then hard-coded initialization is fine. However, as you write more similar previews, such an approach results in repetitive and fragile code, and hence worsens maintainability of the codebase. The solution is the Fixture Object pattern.
The purpose of the Fixture Object pattern is to simplify object instantiation.
The proposed implementation of the pattern utilizes factory methods with default values. Here is how we can implement the Landmark fixture:
extension Landmark {
    static func fixture(
        id: Int = 1,
        name: String = "",
        imageName: String = "",
        coordinates: Coordinates = .fixture(),
        state: String = "",
        park: String = "",
        category: Category = .featured,
        isFavorite: Bool = false
    ) -> Landmark {
        Landmark(
            id: id,
            name: name,
            imageName: imageName,
            coordinates: coordinates,
            state: state,
            park: park,
            category: category,
            isFavorite: isFavorite
        )
    }
}

extension Coordinates {
    static func fixture(latitude: Double = 0, longitude: Double = 0) -> Coordinates {
        Coordinates(latitude: latitude, longitude: longitude)
    }
}
In case of high-level SwiftUI views like LandmarksList, we are interested only in the shallow verification, since we have already validated lower-level components in their own previews. Therefore, for the most of the object properties, we can get away with default values from our fixture implementation.
Here is how we can rewrite LandmarksList_Previews using fixtures:
struct LandmarksList_Previews: PreviewProvider {
    static var previews: some View {
        let userData = UserData()
        userData.landmarks = [
            .fixture(id: 1, name: "Turtle Rock", imageName: "turtlerock", isFavorite: true),
            .fixture(id: 2, name: "Silver Salmon Creek", imageName: "silversalmoncreek", isFavorite: false)
        ]

        return LandmarkList()
            .previewDevice("iPhone SE")
            .environmentObject(userData)
    }
}
I’d venture to guess that if it were a production app, you would check more cases in the preview:
struct LandmarksList_Previews: PreviewProvider {
    static var previews: some View {
        let twoRows = UserData()
        twoRows.landmarks = [.fixture(name: "Turtle Rock", imageName: "turtlerock", isFavorite: true)]

        let longList = UserData()
        longList.landmarks = Array(repeating: .fixture(name: "A"), count: 100)

        let longName = UserData()
        longName.landmarks = [.fixture(name: String(repeating: "A", count: 200))]

        let favorites = UserData()
        favorites.landmarks = [
            .fixture(id: 1, name: "A", isFavorite: true),
            .fixture(id: 2, name: "B", isFavorite: false)
        ]

        return Group {
            LandmarkList()
                .environmentObject(twoRows)

            LandmarkList()
                .environmentObject(longList)

            LandmarkList()
                .environmentObject(longName)

            LandmarkList()
                .environmentObject(favorites)
        }.previewDevice("iPhone SE")
    }
}
Source Code
You can find the complete source code here. It is published under the “Unlicense”, which allows you to do whatever you want with it.
Summary
SwiftUI previews are actually pieces of test code inserted into your production codebase. Their quality is equally important as that of the rest of your production code. We have discussed three techniques that will help you improve previews code:
- Extracting reusable previews into components.
- Preview presets.
- The Fixture Object pattern.
As a further reading I recommend Testing SwiftUI Views, where I explain why you shouldn’t be using SwiftUI previews as your visual regression tool.
Thanks for reading!
If you enjoyed this post, be sure to follow me on Twitter to keep up with the new content. There I write daily on iOS development, programming, and Swift.
